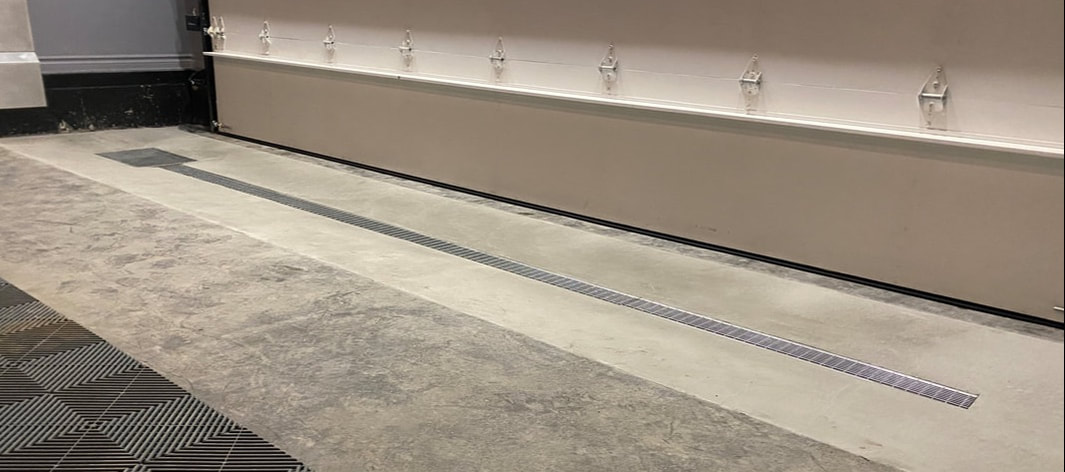
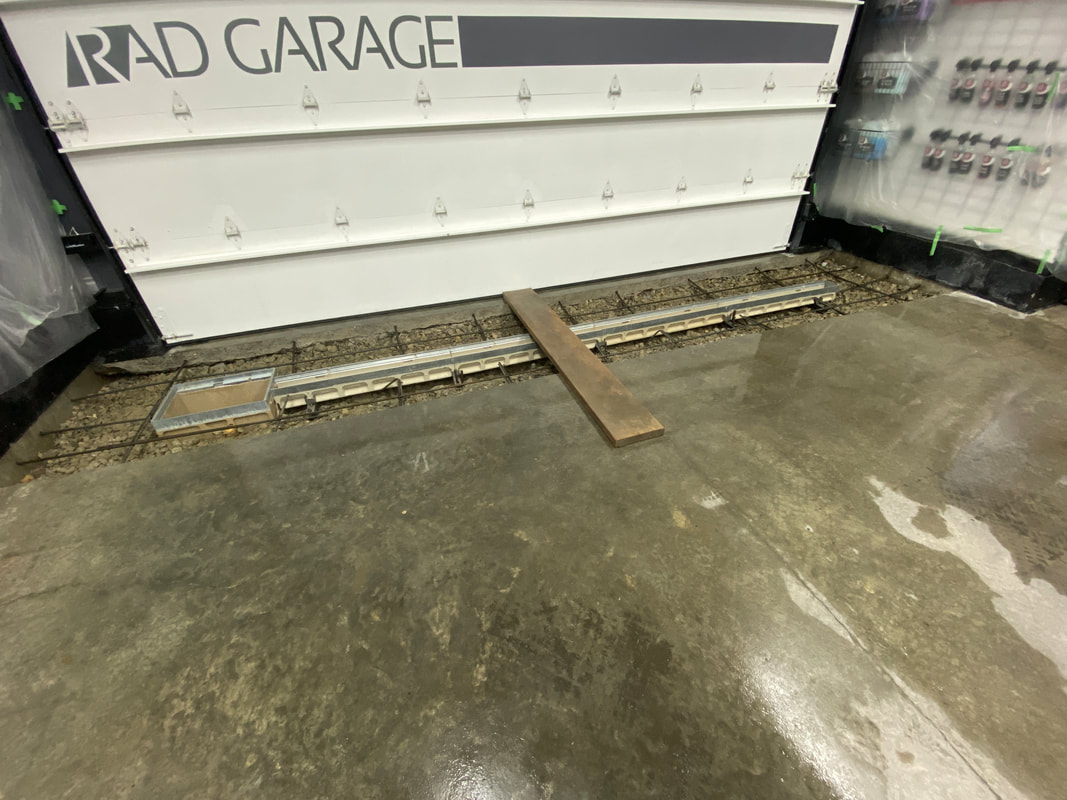
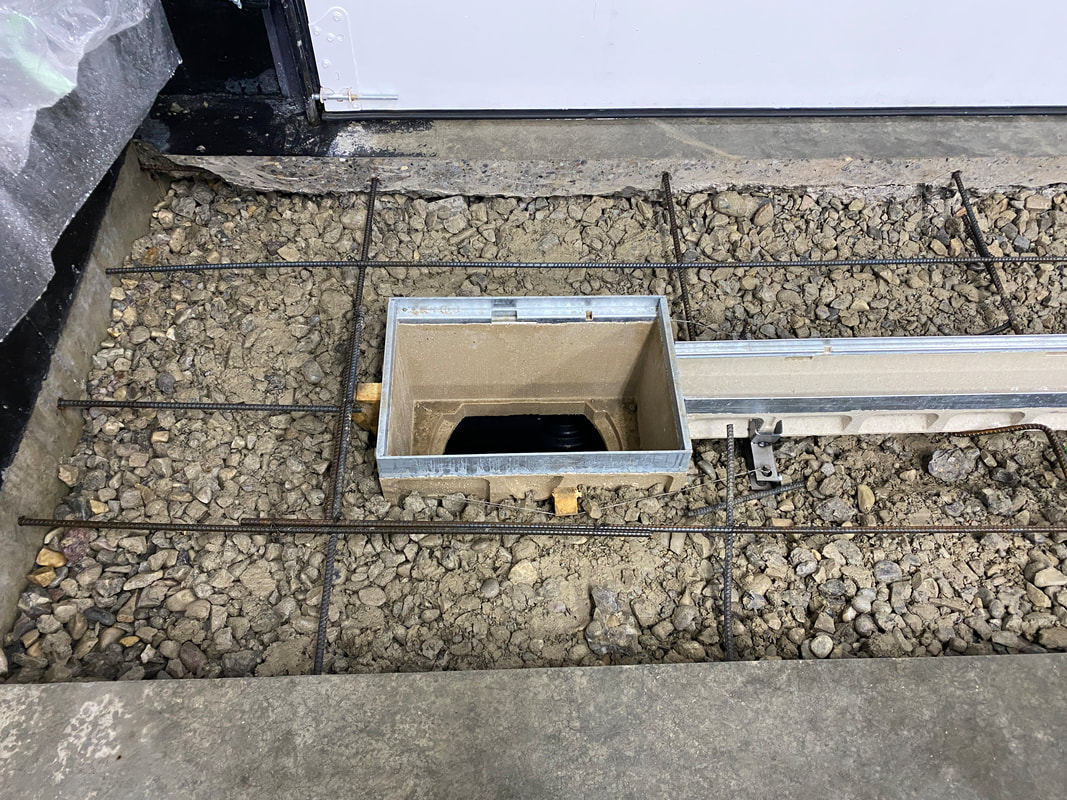
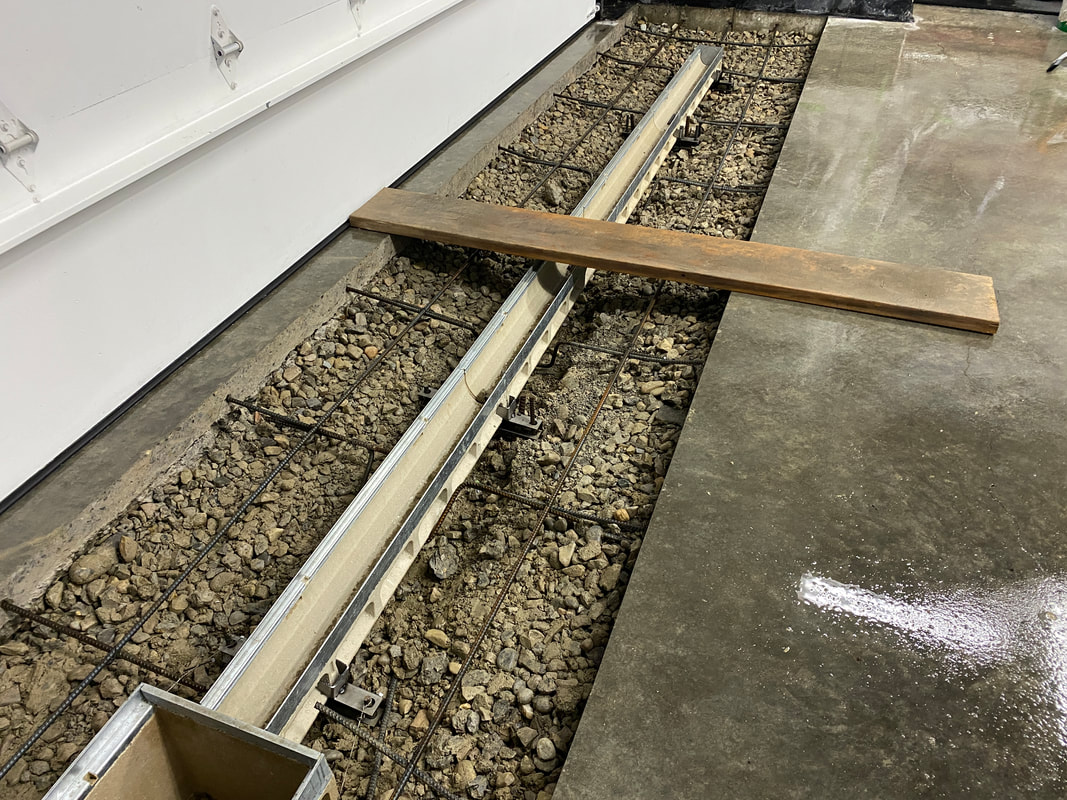
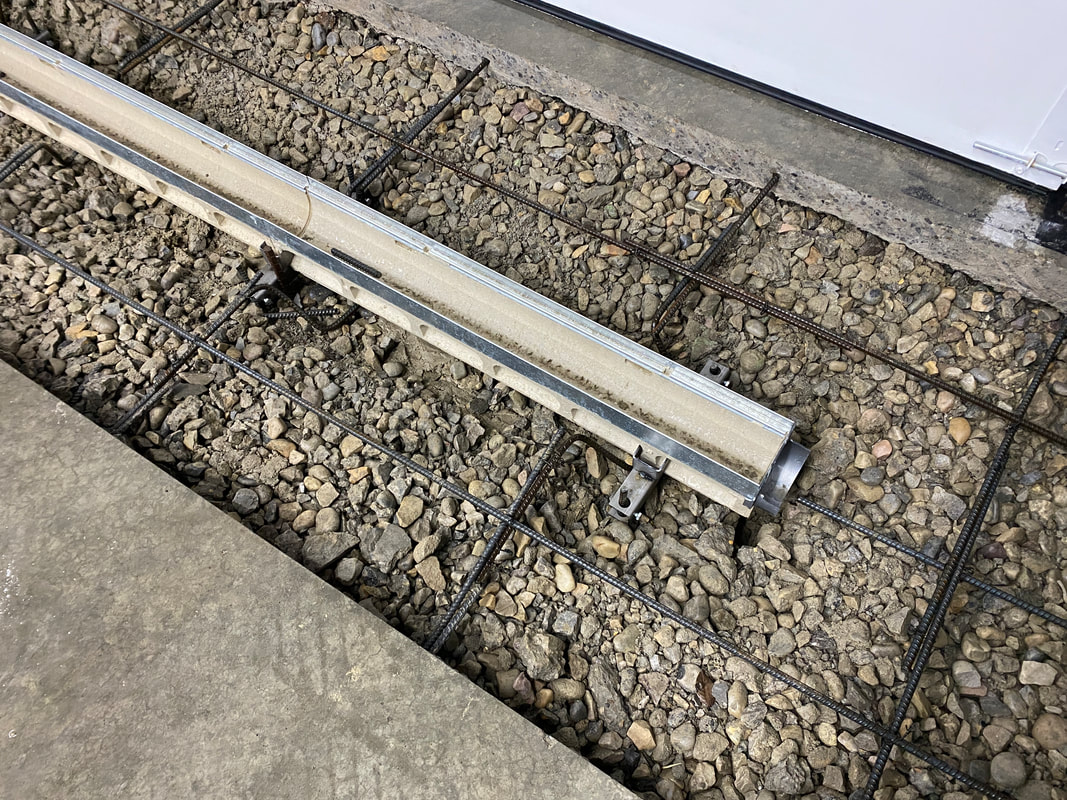
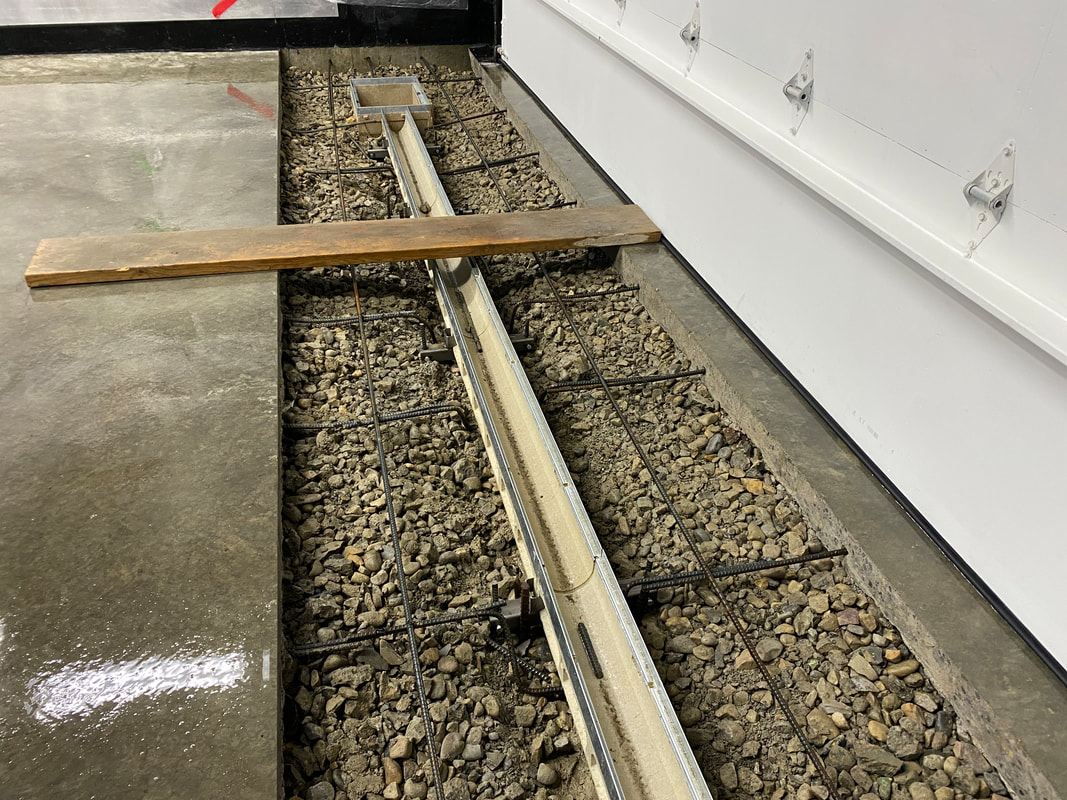
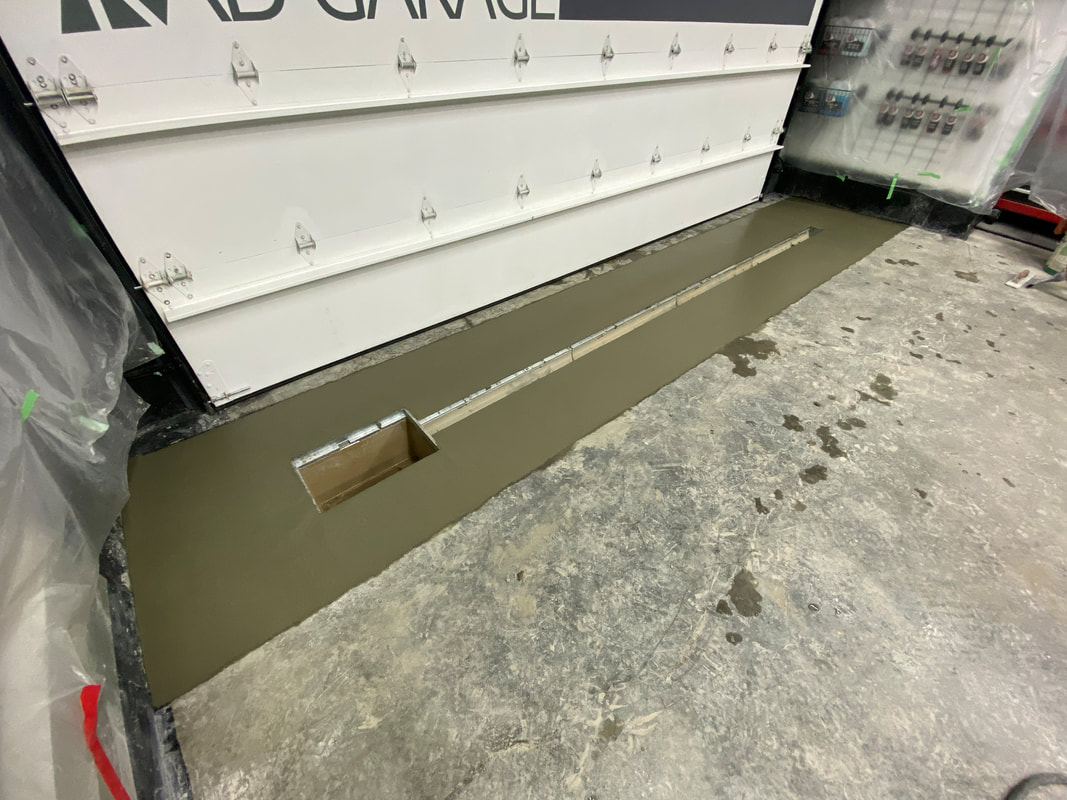
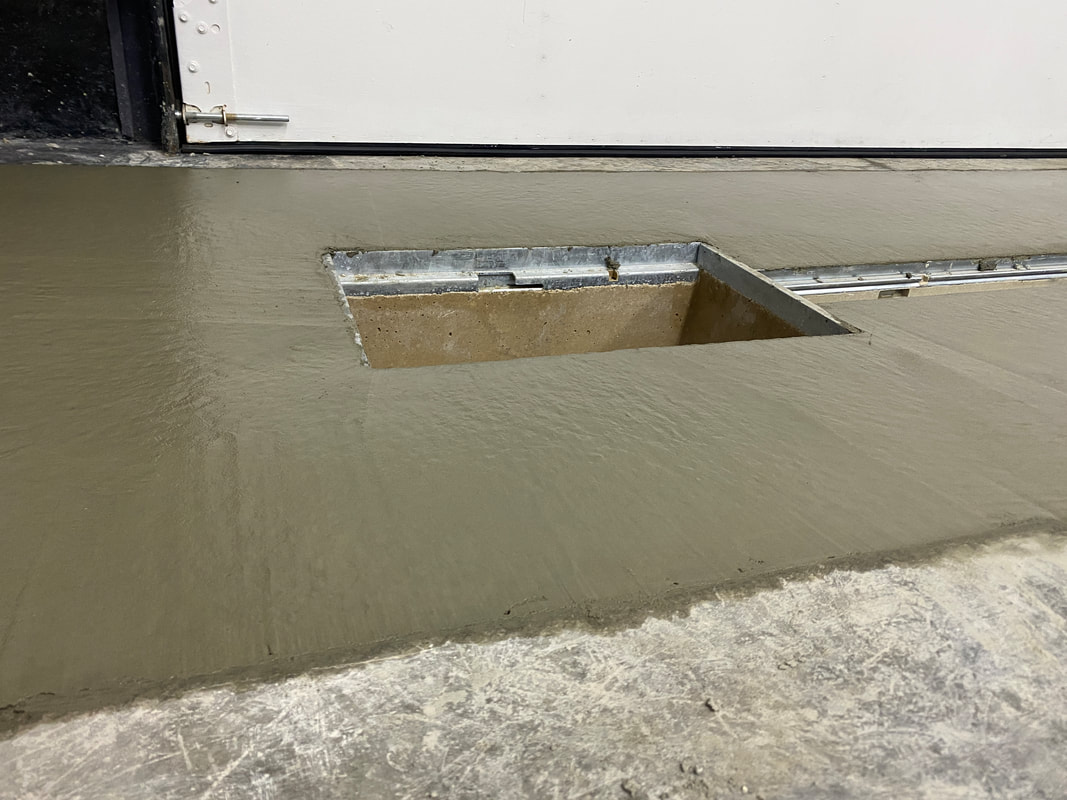
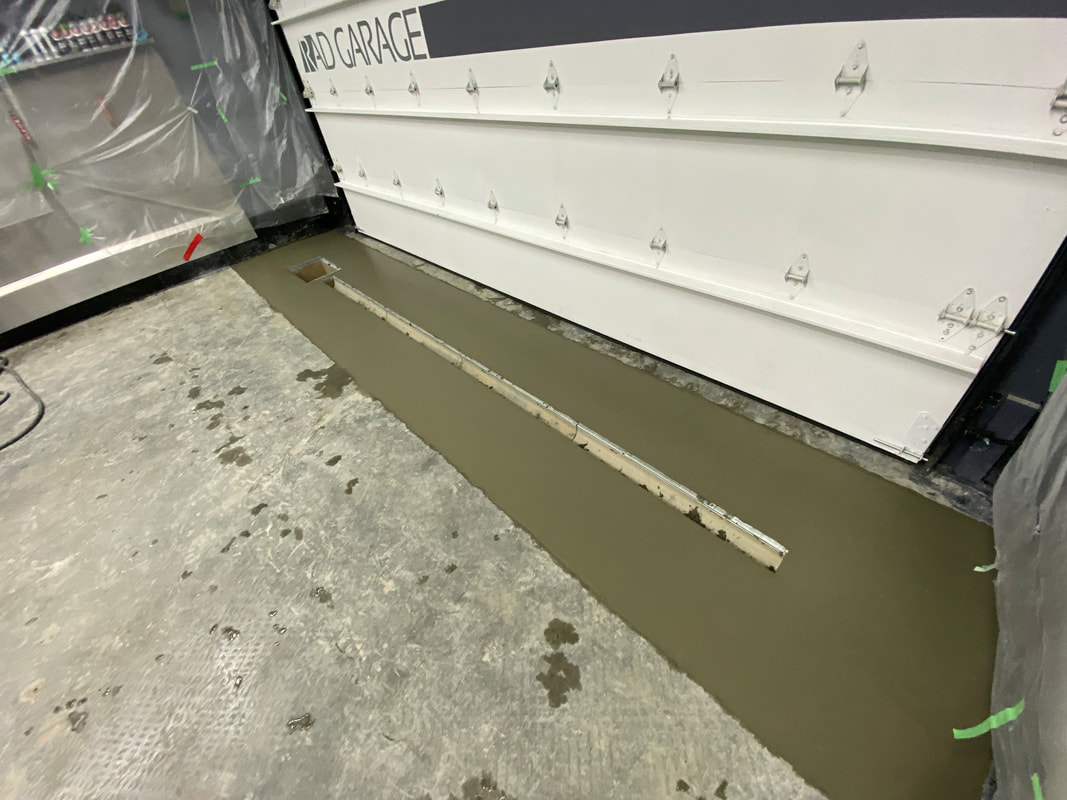
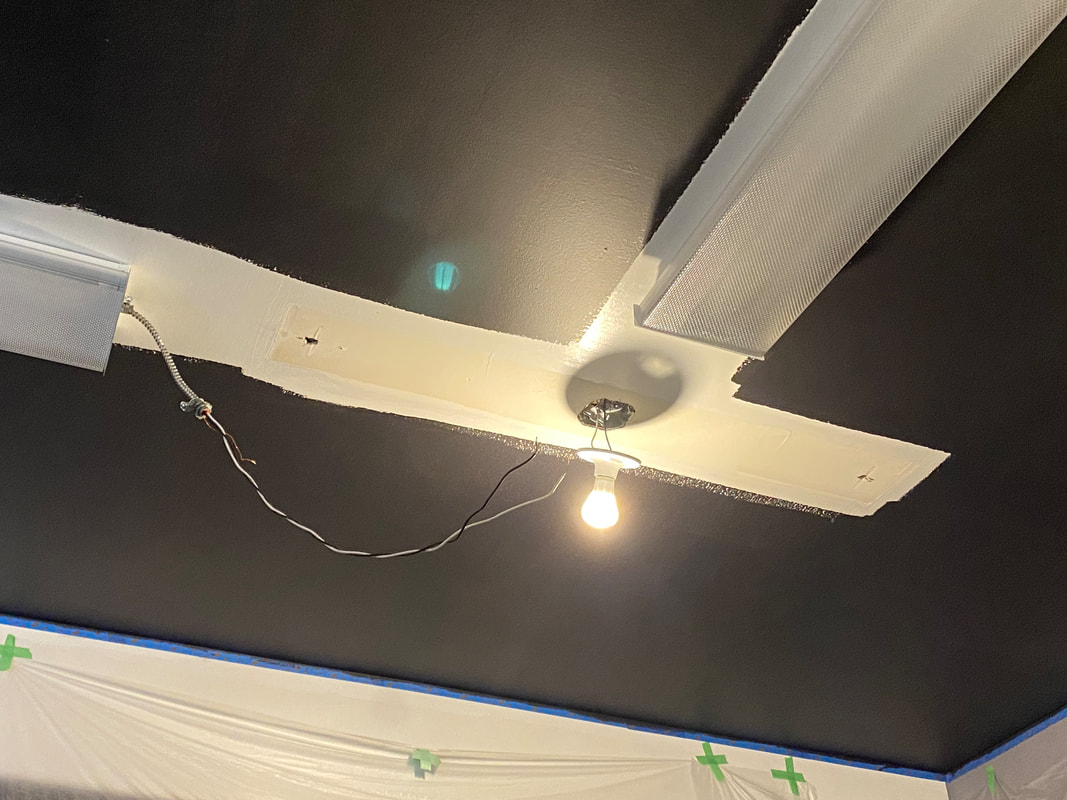
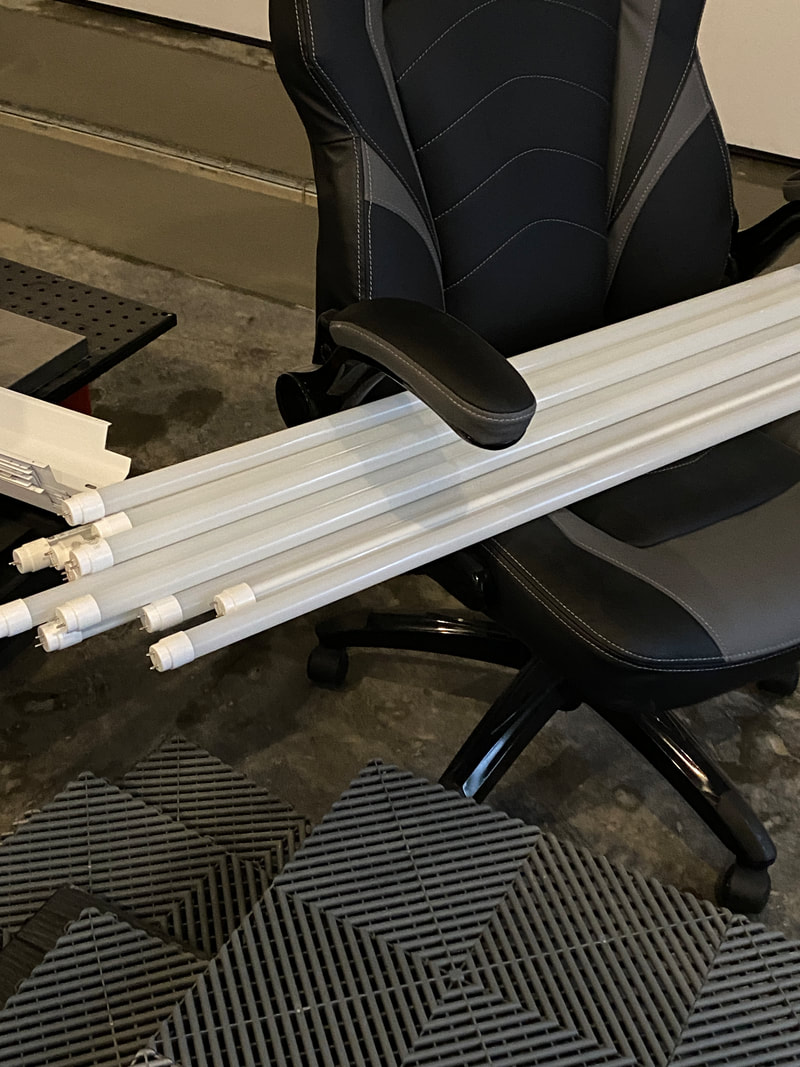
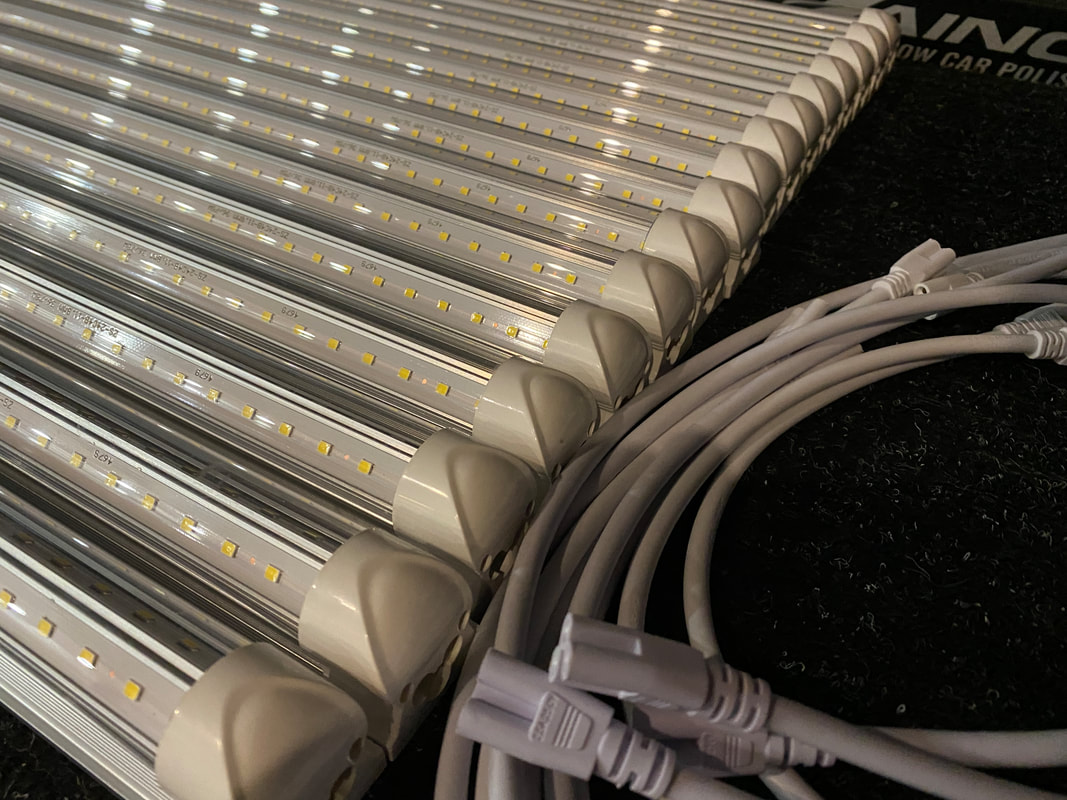
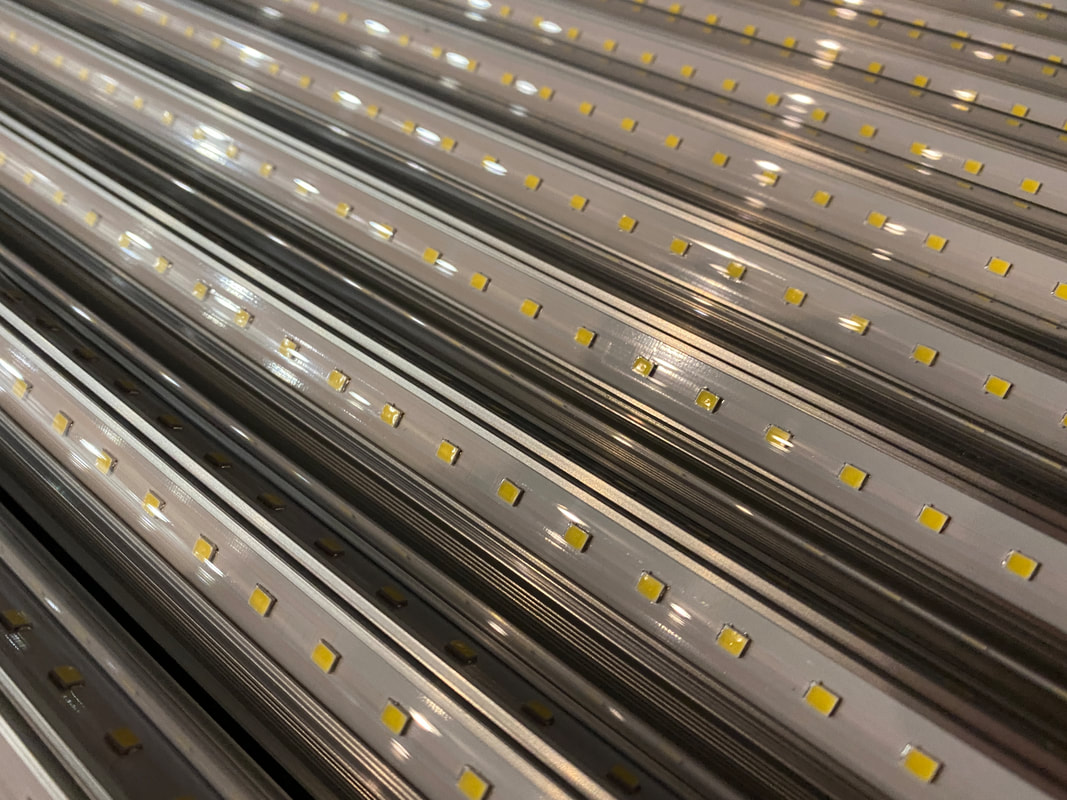
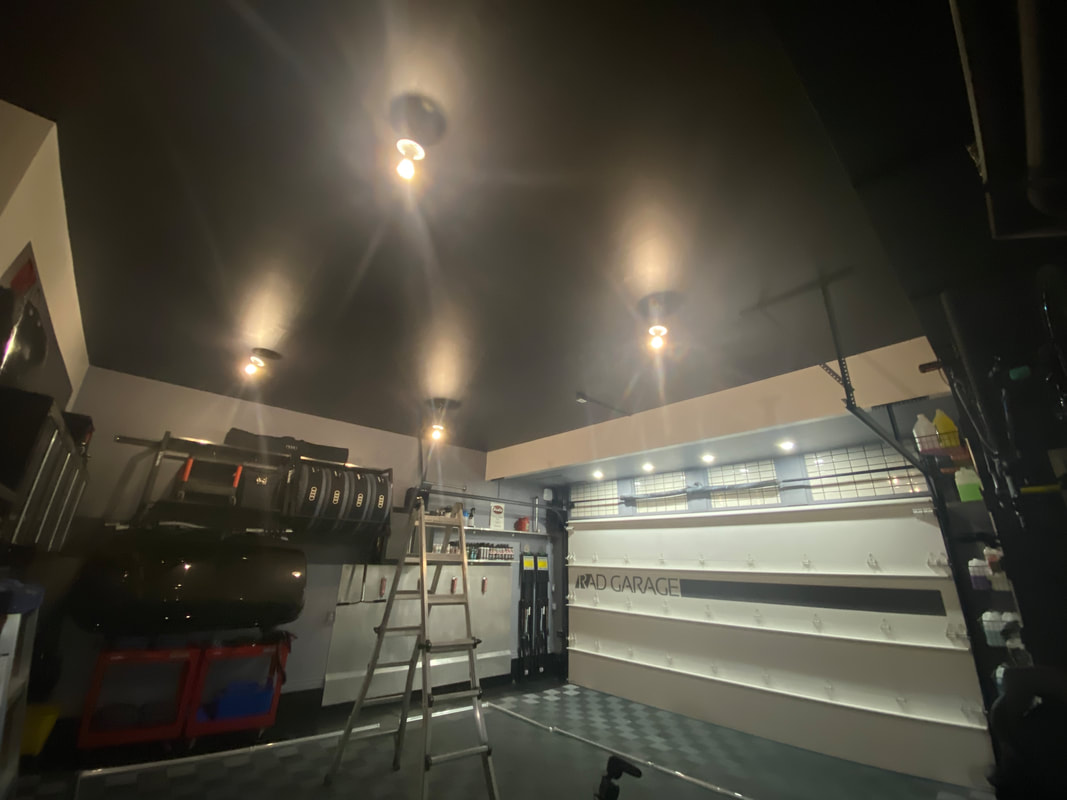
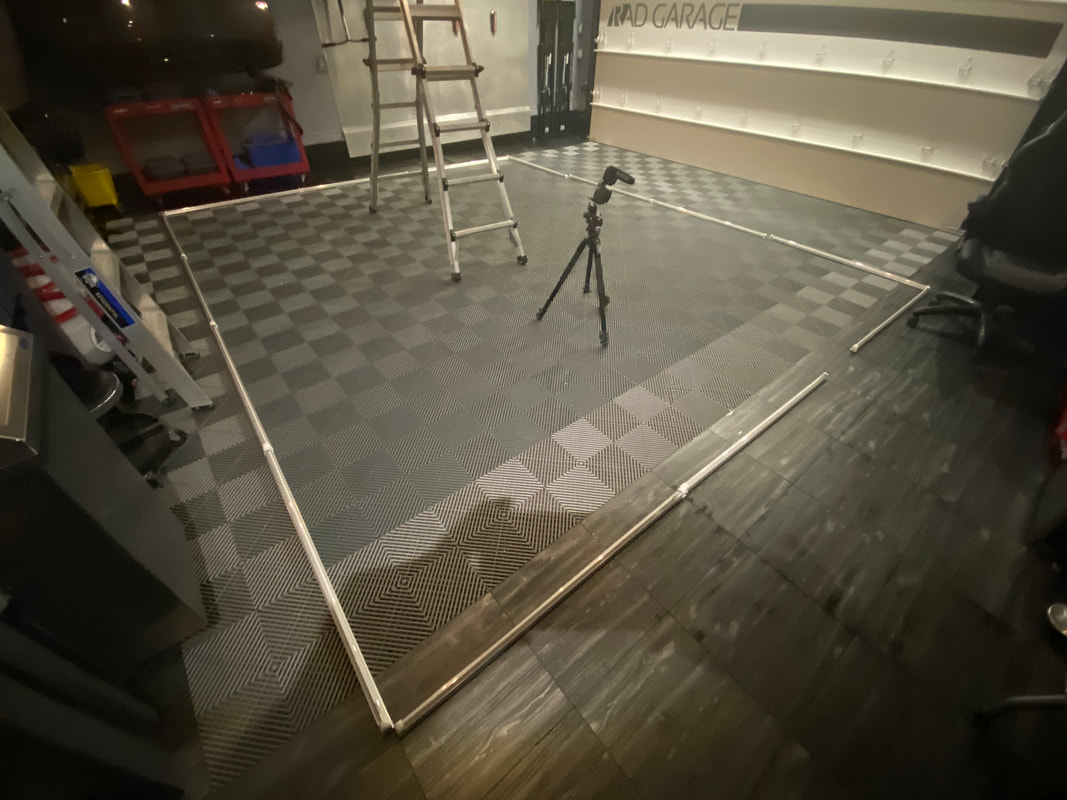
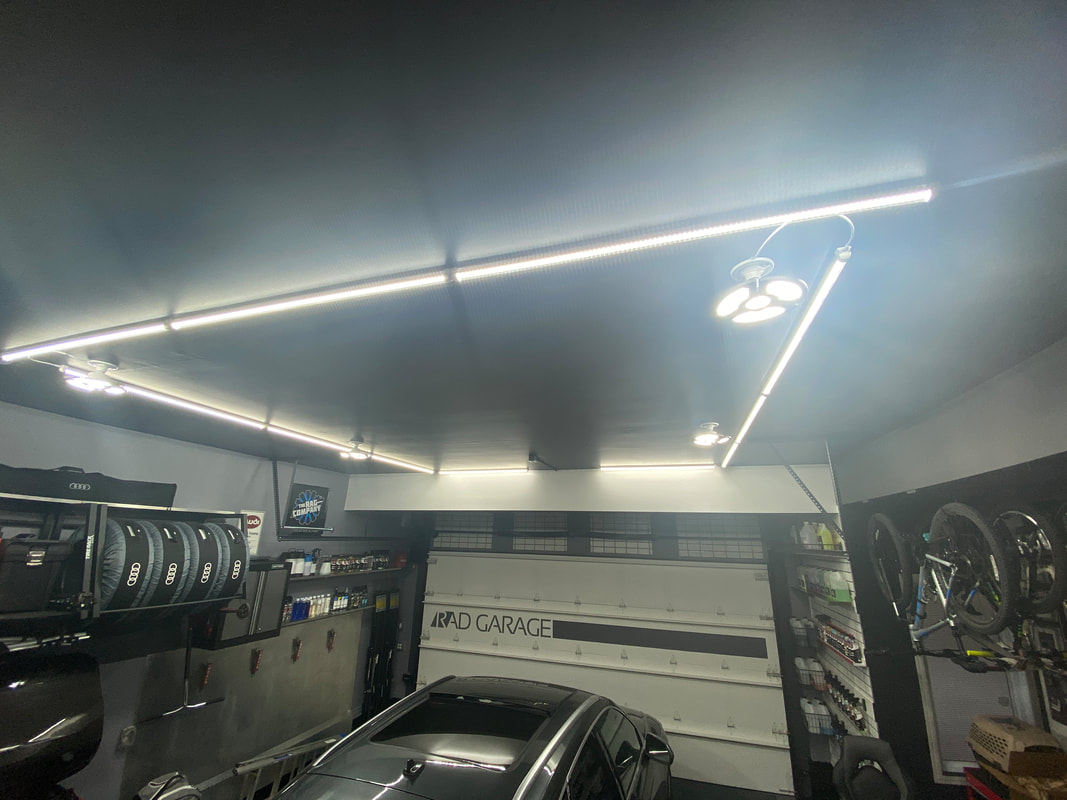
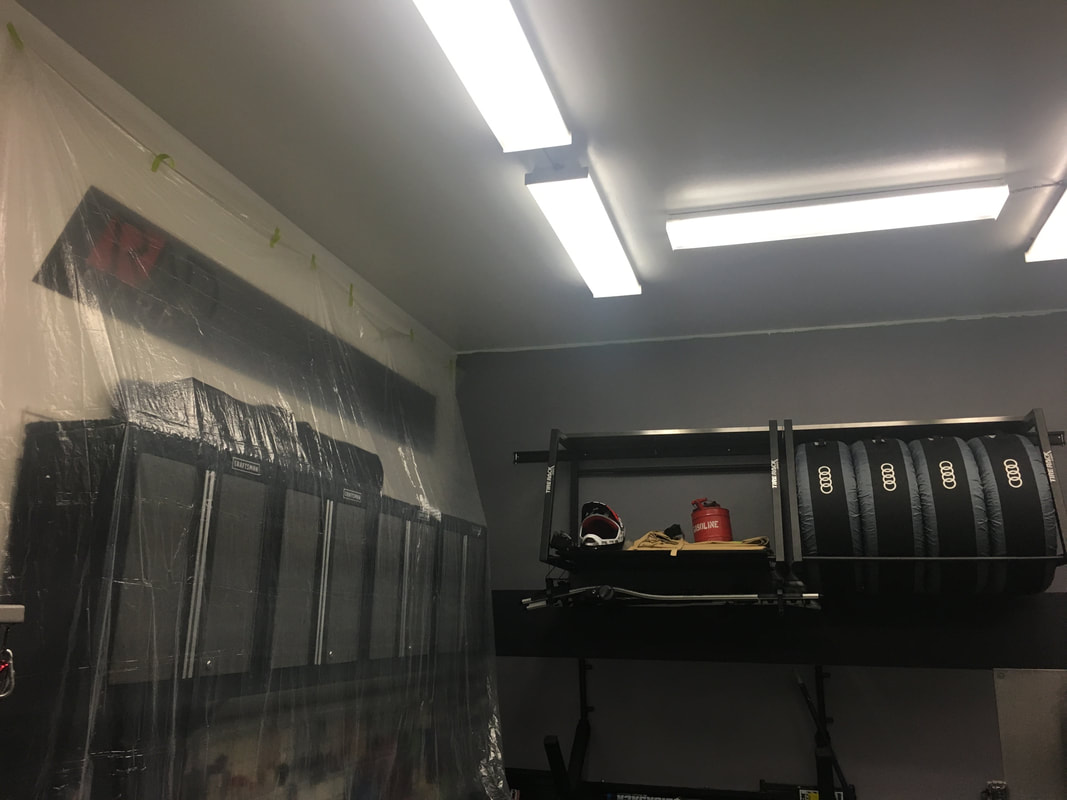
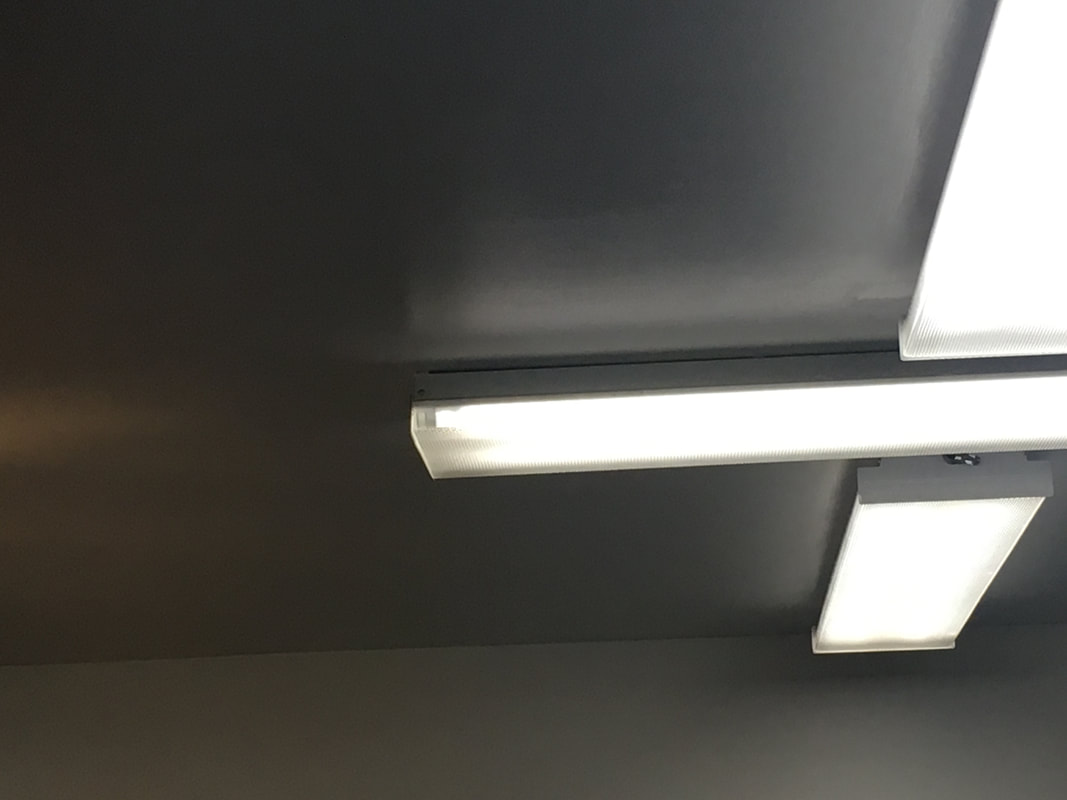
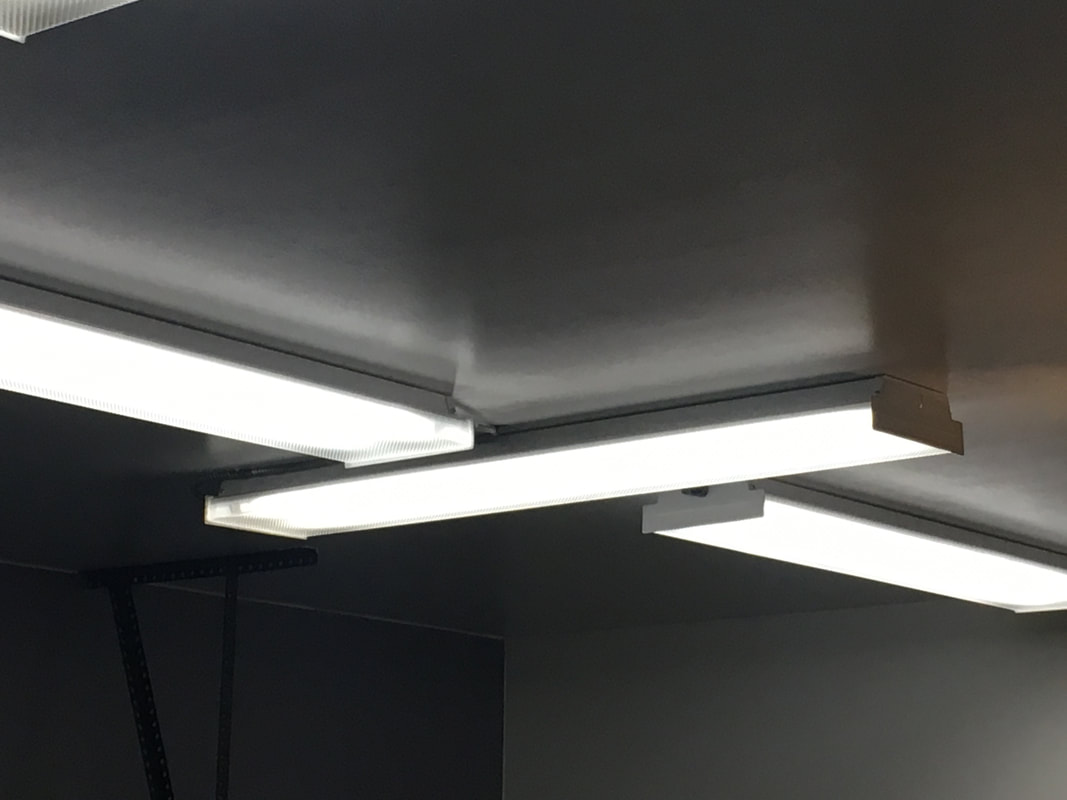
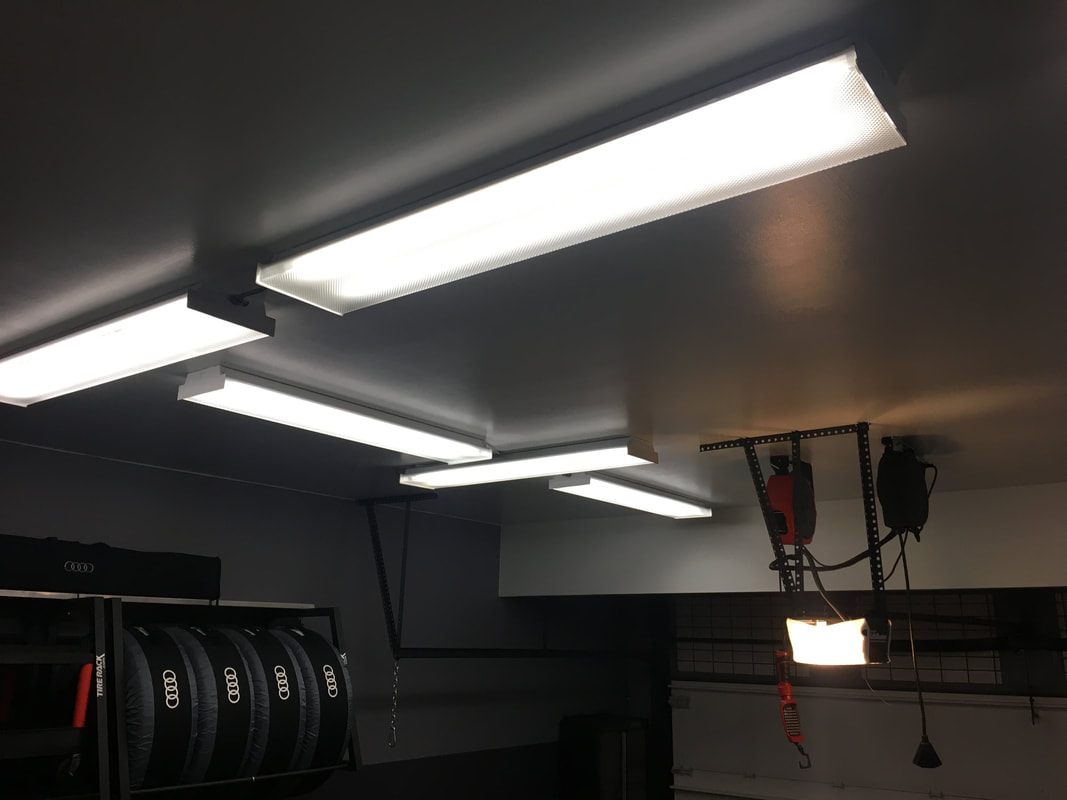
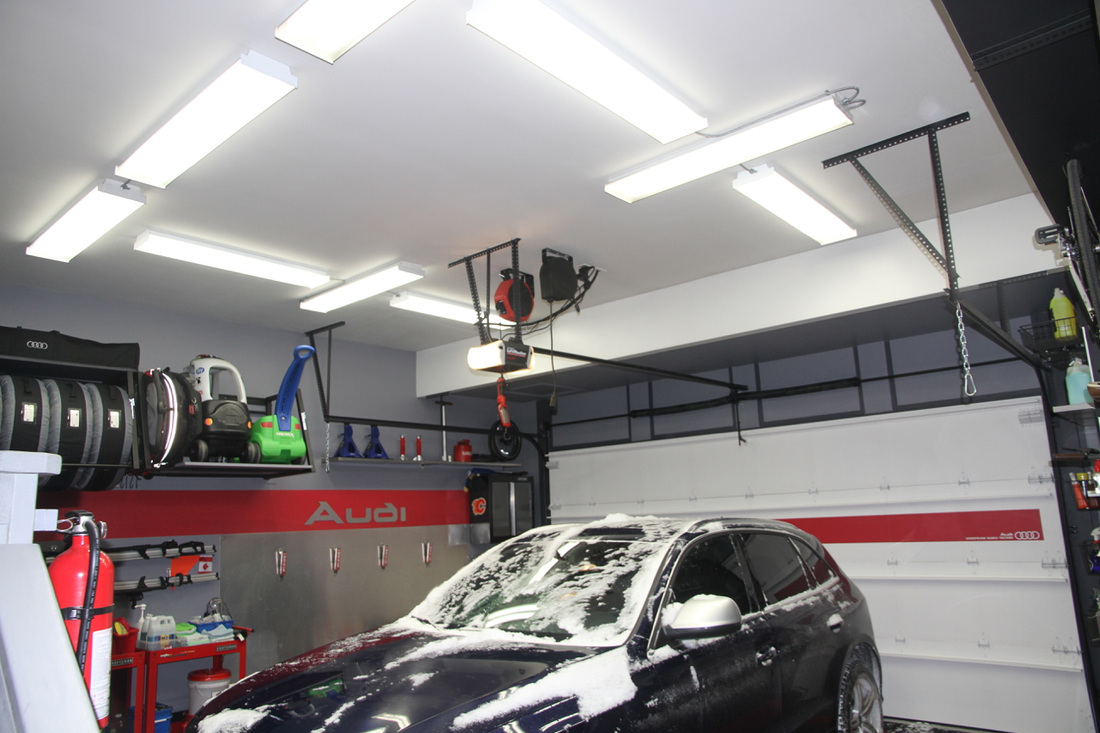
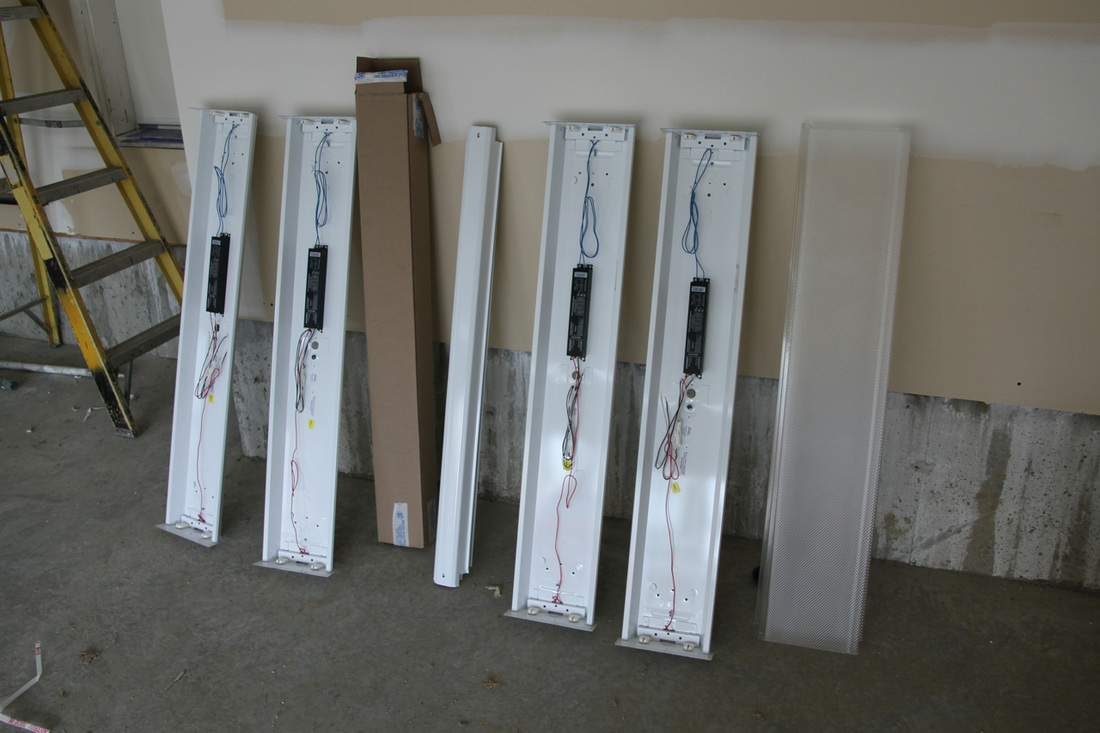
 Winter is the perfect time of year to shift my focus to the garage itself. I have always endured drainage challenges that come with snow and ice melting and then freezing just outside the garage door. This ice damning can occur often in the winter, so conceiving a drainage system that prevents water from escaping the garage and wrecking havoc on my driveway has always been a goal of mine. I finally pulled the trigger and enlisted a concrete firm to install a channel drain/catch basin system. The installation process was labor intensive and required a 48" wide section of the existing floor to be demolished and removed by hand. Once the concrete was removed, four 1-meter sections of trench drain were precisely positioned one inch below the level of the existing floor and pitched towards a large catch basin with a 30-gallon capacity. The concrete was then poured and shaped in such a way that all water will be directed towards the channel sections. No water will now escape the garage and cause me headaches in the winter. While that job was in progress, I took it upon myself to paint the ceiling and install all new lighting. A company out of Saskatchewan called LevKom reached out to me and generously offered to supply me with all new LED lighting necessary to turn my space into an even more effective detailing environment. With the help of an electrician friend, we removed all nine existing fluorescent 2-bulb fixtures and installed four 60-watt "trilights" and eleven 30-watt 48" LED linkable tubes. The lighting install took six hours in total and turned out great. These three upgrades have breathed a lot of new life into my garage. I am still in the process of cleaning up all the dust from the concrete work and sanding of the ceiling, but it already looks even more amazing than before. In addition to just looking better, I am now able to conduct details year-round. The garage is now a much more comfortable and efficient place to do my thing! I have documented all of these changes in a 3-video series I call "Floor to Ceiling". This video demonstrates the demolition stage of the drainage project. The crew worked tirelessly for about six or seven hours removing a 48" wide portion of the existing slab. I wasn't able to record the footage of the actual drain and basin placement, but this video shows how they were placed in the excavated portion of the floor. This video demonstrates the final result after the concrete was poured to fill in the system. It also demonstrates the system in action as I perform a quick floor clean.
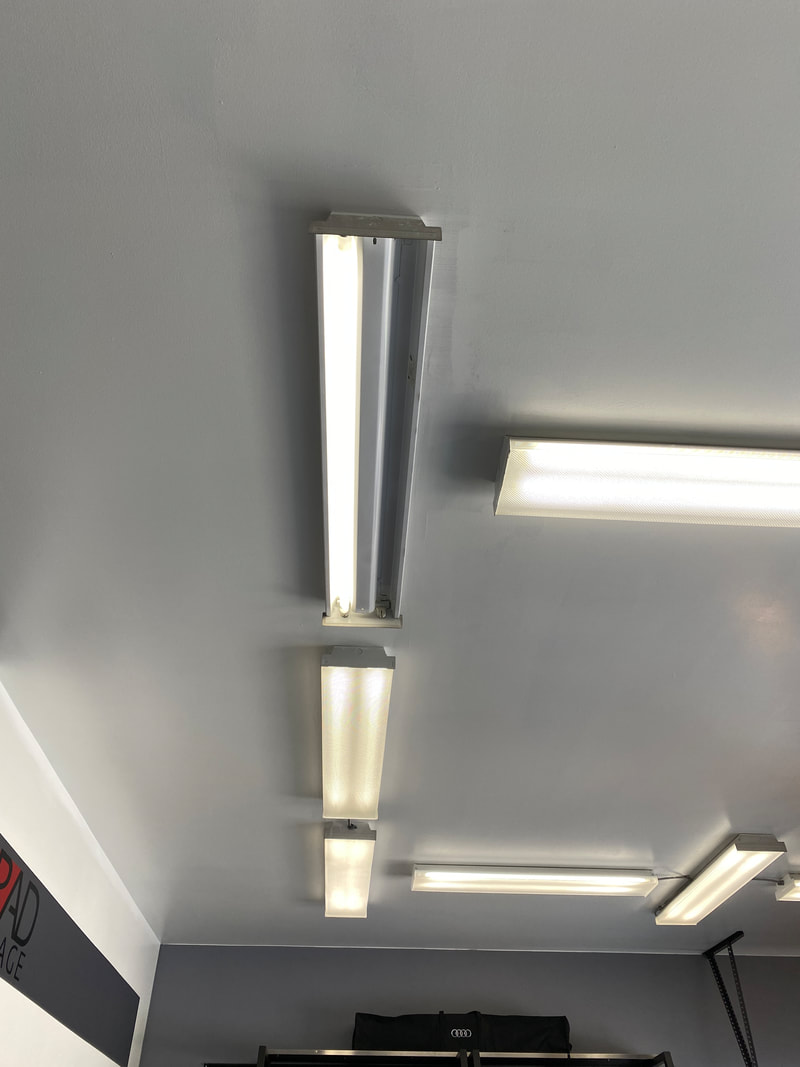
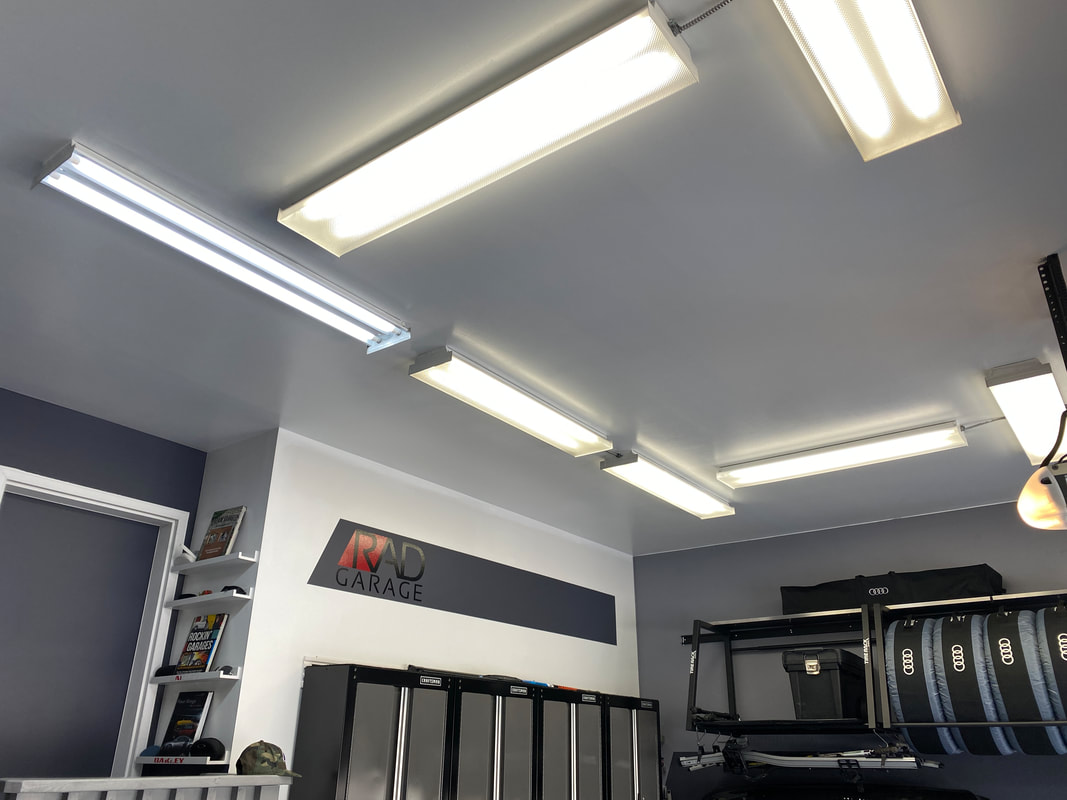
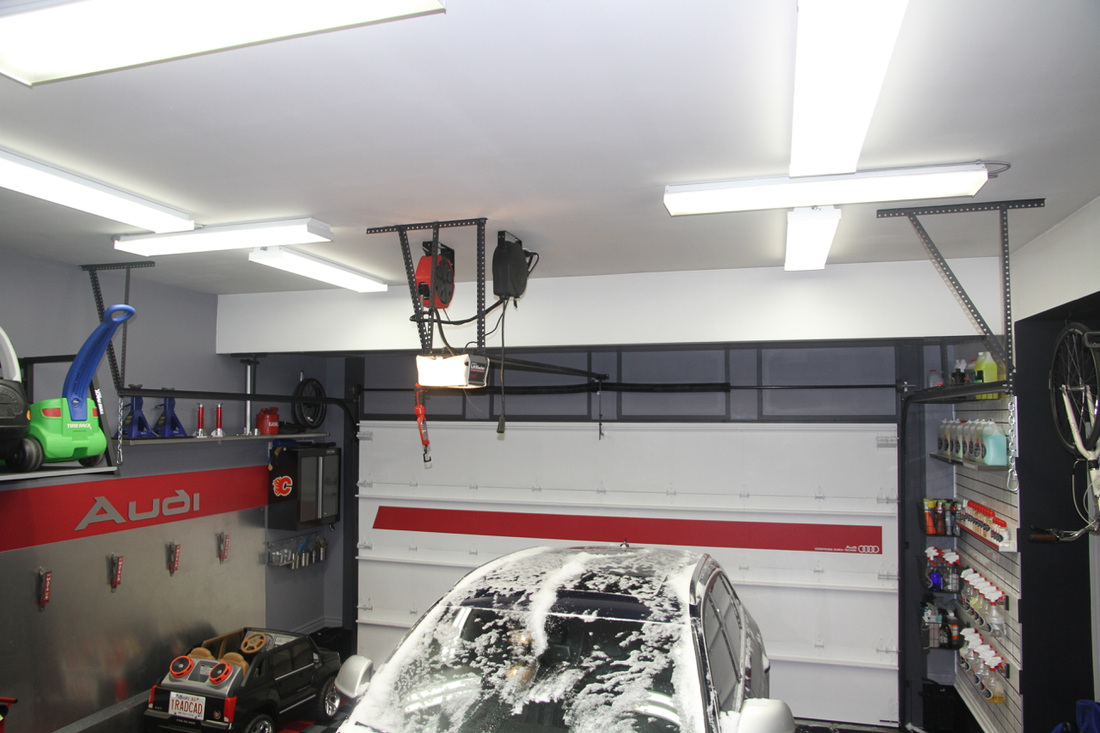
I was not happy with the performance of my aging garage door opener unit. It has served our family well for the past decade, but the entire system was dated and it was time for an upgrade. I connected with Mike Awada from Triton Door Services after a neighbor recommended him. He stopped by the garage and we chatted about all the possibilities and I settled on a Liftmaster 8500W side-mount "Jack Shaft" opener. The install process was somewhat complicated, but with the help of my amazing brother-in-law Ryan, we ran electrical service to the corner where the unit was mounted. We also rerouted the wall switch and sensor wires from the middle of the ceiling to the same corner. Then, we installed four slick little 4" LED pot lights (can lights) to provide some much needed task lighting to the lower ceiling portion of the garage. What an amazing difference these adjustable (3000-5000k) lights have made. This video isn't a complete step-by-step install guide, but more of a look into my thinking and how I integrated all the components into my already highly developed garage. If you are interested in upgrading your garage door opener, I highly recommend you find a qualified door technician in your area. It’s also a good idea to have a quality electrician on speed dial too! 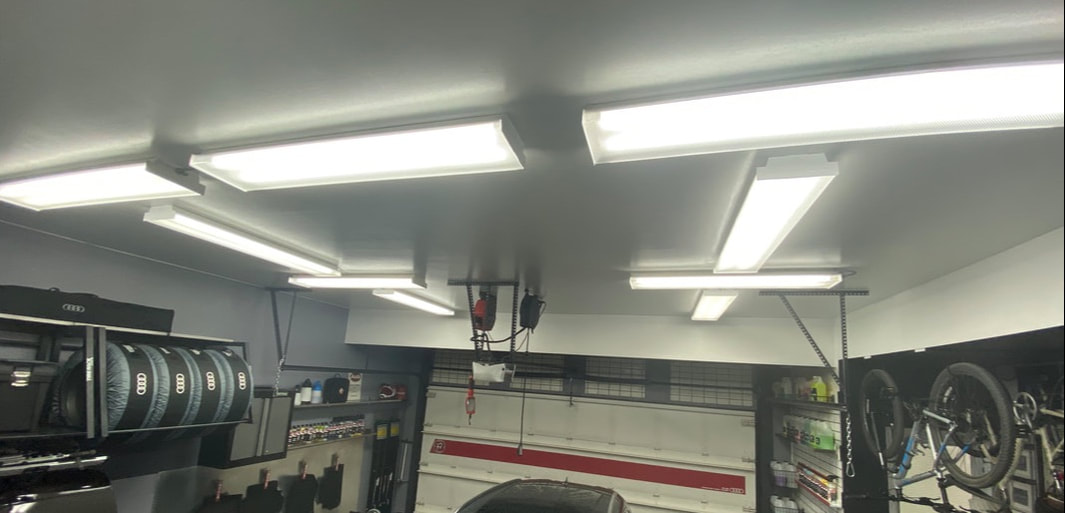 My garage now features 18 X LED 6500K "Daylight" bulbs After almost ten years, my first fluorescent bulb burnt out in the garage. I went down to the local Lowe's to source a new one but ended up leaving with 18 LED bulbs to replace all of my remaining fluorescents. I chose GE 15W LED T8 48-in Daylight bulbs that work seamlessly with my existing fixtures. The difference this had made to the overall amount of light in the garage is absolutely night and day. These bulbs are rated to last 36,000 hours. They emit light that measures 6500 on the Kelvin Color Temperature Chart. This temperature of light is often referred to as crisp and invigorating. It does give the garage a much more clinical tone, which I appreciate. These bulbs are rated at 1800 Lumens and rate 80 on the color rendering index (CRI). I admit, I don't know exactly what all of this technical jargon means, but what I do know is that my garage is way brighter than it used to be. Capturing the difference on camera isn't easy, but here are some pics I snapped during the replacement process. In addition to installing the new bulbs, I took some time to clean the diffusers and some of the dust that accumulated on the fixtures. I picked up a "contractor's box" of 16 bulbs ($127.49) plus an additional 2-pack ($28.04). I lucked out and found them on sale which left me with savings of almost $30. In the end, this was a very economical way of improving the overall amount and temperature of light in the garage and I couldn't be more pleased. It's an ongoing battle keeping the garage clean, but I enjoy the process. I was able to do a full wash of the floor yesterday and then my son and I filmed a guided tour video. Check them out: This was a job that I had been putting off for years. I painted the entire garage with a white primer back when I first took possession of our house in 2010. Since then, I have been meaning to put a proper coat of paint up there, but I just never seemed to find the time or desire. When I ripped up the RaceDeck floor to sell, I took advantage and got 'er done. Capturing the results is tricky with my iPhone, but hopefully these pics will give you an idea of how things turned out. I like how the paint added a reflective effect to the ceiling. Here is a link to the paint I used. It is a "semi-gloss finish" interior acrylic latex paint from Rona.
I am excited to share this charming garage from Reykjavik, Iceland. Brynjar Hartharson is a mechanic who works primarily on GM cars. He has created an impeccable detailing environment he uses to care for his cars and the cars of others. I have been a fan of his space since I first caught wind of it on his Instagram. It was instantly apparent that Brynjar and I have similar tastes in many regards. Like me, he is an avid hobbyist detailer, obsessively pampers his German car, and prides himself in maintaining a very neat and organized workspace. I am thankful he agreed to answer my questions about his garage story and I was extremely flattered he mentioned my garage as one of his design inspirations. I am confident you will be as impressed with his space as I am. So, off we go to Iceland!  The vitals
The inspiration I have always been passionate about cars, dreaming of one day buying my own house with a garage. After I stumbled upon The Garage Journal in 2011, I spent a lot of time looking at garage projects and getting inspiration for my own in the future, I had designed the basic layout and look in my mind long before I had a garage.
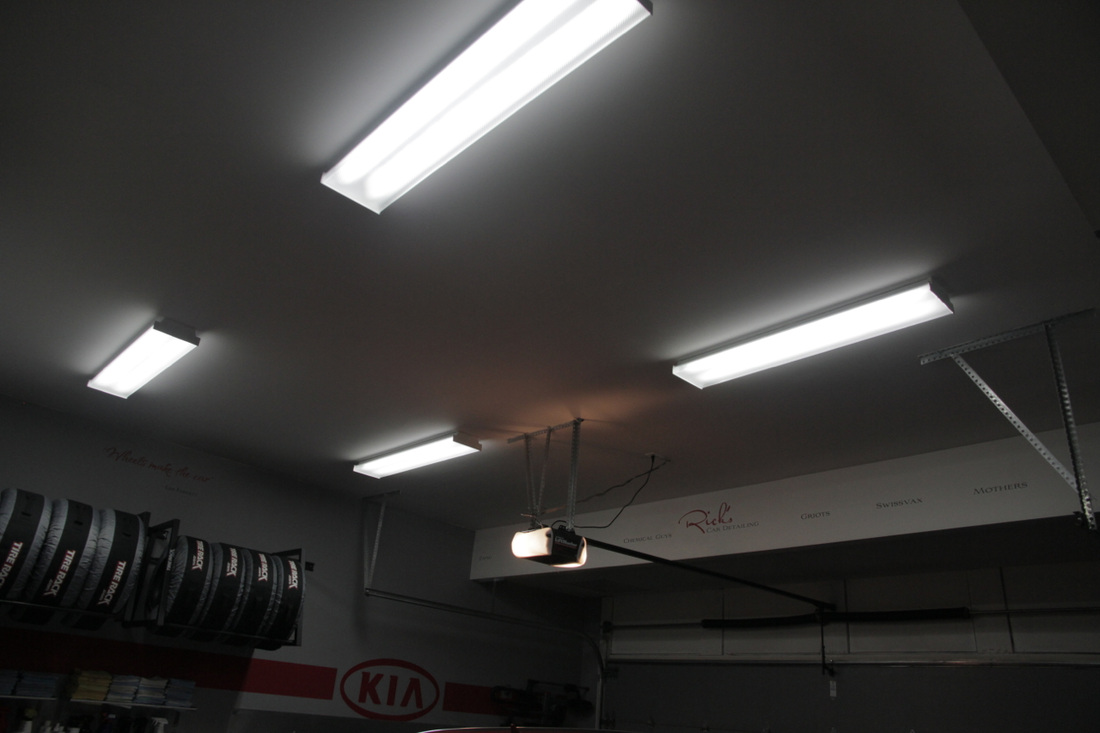
It is challenging attempting to take photos of lights. I am in awe of how bright my garage has become now that I have added some additional fluorescent fixtures. I took 50 photos, using every setting I have on my camera, but I could only capture two photos that accurately depict what the light looks like in the garage. With the increase in light output in the space, I can now see parts of the garage that I never really noticed before. For instance, I can now see that the shelf on my tire rack was filthy. I'm going to have to be more diligent with my dusting!
I have found the answer to my lighting issue. I am going to upgrade the 4 existing 2-lamp T8 fixtures with 4-lamp models. I'm in the process of working out the install date, but I'm excited at the prospect of doubling the amount of fluorescent light in there. Cooper Lighting WN432 specs: F32T8/35K Lamps 3100 Lumens Efficiency 79.1% Yearly Cost of 1000 lumens, 3000 hrs at .08 KWH = $2.86 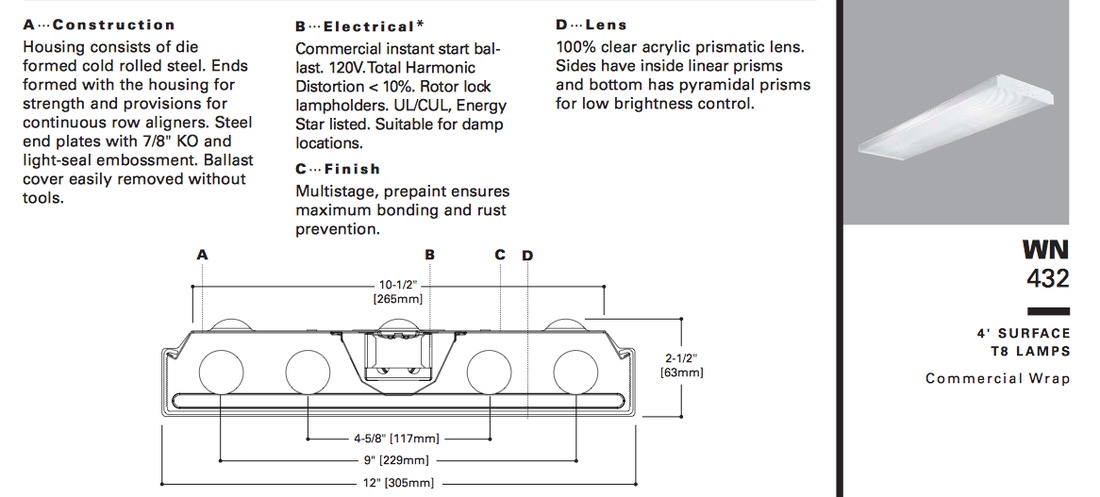 My garage isn't dark by any means, but I need it brighter. I have 4 2-lamp 48" T8 fixtures, but I am playing with the idea of replacing them with 4-lamp models. I am having some difficulty finding exactly what I have in mind, since most 4-lamp fixtures are designed for high bays. Part of me thinks mounting fixtures designed for commercial warehouses would be awesome, but the practical side of me realizes that would be overkill. Here's what I'm currently dealing with. It's adequate, but I think a world-class garage deserves world-class lighting. Once I have the fixtures, it's just a matter of having my brother-in-law's electrical firm mount them up.
|

RAD GARAGE is my personal detailing theatre. I am a teacher who finds immense pleasure in completing deeply therapeutic, thorough and highly satisfying detailing projects in my residential garage. I have converted my suburban double car garage into a world class detailing environment and I enjoy caring for my own car and select cars belonging to others. The garage and the work I complete in it have allowed me to connect with other detailing enthusiasts from around the world.

I have teamed up with Teespring to offer viewers an opportunity to grab some RAD gear! Click here to see the current inventory of RAD merchandise available at my Teespring store!
Use "RAD10" to save yourself 10% until the end of March, 2021.

Carzilla is a local detailing store that caters to the North American community of professional and enthusiast detailers. I have been a longtime customer and I am fortunate to call the owner a friend. Besides stocking a vast quantity of top quality detailing products, the owner has supported various garage and detailing projects of mine over the years.
5% discount code
|


 RSS Feed